Knit Cabled Tea Cosy from the December 1946 "My Home" Magazine
Description:
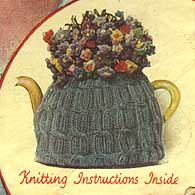
KNITTED in a delightful cable pattern this teacosy is lined with wool in a contrasting colour. It fits the teapot closely and neatly with a hole for the spout and one for the handle so that it need not be removed when the tea is poured out.
The flowers are made from lengths of bright wools, bunched together into a colourful posy and arranged on the top of the cosy.
Materials:
- One ounce of Sirdar Super Shetland Wool; 3-ply, in turquoise blue for the outside, and one ounce of the same wool in a contrasting colour for the lining.
- A pair of No. 8 knitting needles
- oddments of embroidery wool, or fingering, in gay colours for the flowers.
- A short spare needle for the cable stitches
Tension and Measurements:
Worked at a tension of 6 ½ sts to the inch in width on No. 8 needles, the cosy will measure 6 ½ inches high and 18 inches all round the lower edge when made up
Abbreviations:
| Abbreviation | Definition |
| K | knit plain |
| P | purl |
| st | stitch |
| st st | stocking-stitch (k. on the right side, and p. back) |
| cable | To cable 6 slip the first two sts from the point of the left-hand needle on lo the cable needle, and leave these an front of the work, K the next four sts, then K the 2 sts left on the cable needle. |
* Directions in brackets are worked the number of times stated after the brackets
To Knit the Tea Cosy:
With turquoise wool cast on 64 sts for one side of the cosy, or for a larger size to cover a family teapot, cast on extra stitches in multiples of 8: By working at the tension given the measurements can be judged. By the same method finer needles can be used for a closer cover, such as No. 10, taking your tension (Which should be 7½ stitches to the inch) then casting on stitches according to the width of cover required. It can be made any depth required, by repeating the pattern rows to equal the height of the pot.
Knit one row into the back of the sts to give a neat edge.
Purl 1 row
Now begin the pattern as follows:
1st row: K1, * k2, p2; repeat from * until 3 remain, k3
2nd row: K1, p2; * k2, p2; repeat from * until 1 remains, k1. Repeat these two rows six times more.
** Cable row: K3, * p2, cable 6; repeat from * until 5 sts remain, p2, k3.
Work the second row again, then the 1st and 2nd rows 3 times more
Repeat from ** for depth required to the top of your teapot, then work the 1st and 2nd rows again.
Break off wool, leaving a long end which you thread into a darning needle and pass through all the stitches. Draw up closely and fasten off securely.
Work a second piece in the same way.
The Lining
With contrasting wool cast On 60 sts and work 60 rows in st st
Draw up the sts as before. Work a second piece in the same way.
To Make Up the Tea Cosy
Join the two outside pieces together at the side seams, beginning at the lower edge and sewing up side as far as the lower end of the handle of the teapot, and on the other side, to the under part of the spout. Leave about 2 ½ inches free for the handle of the teapot, then sew the remaining piece. On the opposite seam leave about one inch and a half for the spout of the teapot. If the tea pot is available measure the space for handle and spout.
Join the lining seams in the same way, then turn inside out and stitch inside the outer cover at the top.
Overcast all round the holes for the spout and handle so at the lining and covers are stitched together. Stitch the lower edge of the lining to the edge of the outside piece, when the lower edge of the outer cover will turn up inside the cosy.
Making the flowers
Forget-Me-Nots:
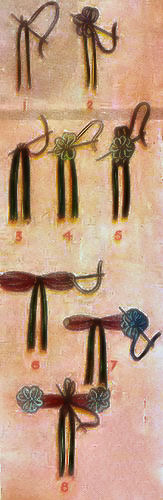
Diagram for making flowers THE FORGET ME-NOTS
Take an 8-inch length of green wool. Fold it in half. Thread the needle with mauve wool and, using it doubled, tie one end to looped end of green wool and make a loop for a petal by passing the needle through the two wools at the knot. Draw the wool through, leaving about ¼ inch for the petal (Diagram 1). Make four or five more loops in the same way (Diagram 2). Knot the ends of the green wool underneath the flower-head. Cut off the mauve wool.
The Daisies:
Use three lengths of wool together throughout. Cut an 8-inch length of trebled green wool for the stem. Fold at in half. With orange wool in the needle work a knot at the fold . This will be the flower centre (Diagram 3). Using yellow wool in the needle work six or seven small loops underneath the centre knot (Diagram 4). Thread the needle with contrasting wool and work another round of larger loops below and outside the first round (Diagram 5). Knot at the back and trim off the ends
Trumpet Flowers:
Use the wool treble throughout. First make the "trumpets" by folding a pink trebled 3 inch length into three. Take an 8 inch length of green wool and tie in the centre of the pink looped wool, making a 4 inch stem. At the end of each pink "trumpet" work a large yellow knot (Diagram 6), catching in the cut ends. Thread the needle with blue wool and make 5 or 6 loops behind each yellow knot (Diagram 7). Trim the ends. Thread the needle with deeper green wool and work three or four loops at the top of the stem for little leaves (Diagram 8)
Footnotes1
1 This text was not in the original pattern as published in 1946 but has been added for ease of use

